HOME STUDIO ACOUSTICS Part 1
This is a brief outline of how I have carried out some basic DIY acoustic treatment to my studio. Although I call this a home studio it needs to be capable of professional quality recording and mixes for my work writing and producing music for TV and film. I am lucky enough to have a live room which sounds great without needing much at all in the way of acoustic treatment so I have concentrated on the control room.
As the studio is solely for my own production and is not hired out, I do not need the control room to sound perfect from every position as you would if there were different people listening from various positions. (It’s very annoying to be sitting at a desk only to have a band member pipe up from the back of the room asking you to turn the bass down, and have to say “come over here and listen to it as it’s always too bassy back there”). Sooner or later I shall work on getting the room more accurate from all angles, but I decided my priorities were to get it right my normal mixing position: sat in front of the speakers with me forming one point of an (approximate) equilateral triangle.
Some of this is science, some is trial and error. In my previous studio I employed a consultant, Howard Turner (Studio Wizard) to give me some advice, which was basically how to set up the monitors and to dampen the high and mid frequencies as the room would be too reverberant otherwise. I also considered bass traps, however I was lucky in that the bass was not a real problem apart from right at the very back of the room. I also always try to get feedback from mastering engineers to find out if they had to do much EQing to my mixes. (NB. sending a mix off to be mastered by an experienced mastering engineer is a great way to check how well your control room is behaving). 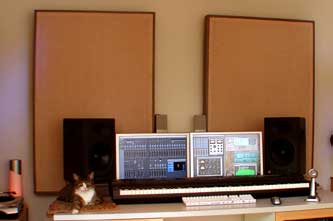
My aim is to make the ambience of the control room feel similar to a typical living room. If the control room is too dry I would probably add too much reverb to the mixes and they would sound too wet on a typical home stereo or on a TV. Similarly if the control room is too reverberant my mixes would end up too dry. Having done a mix I try to listen in as many different environments and systems as possible. It’s probably impossible to get one mix to sound right on every system, but you soon get an idea if there is a basic fault with the room – if your mix sounds OK in the control room, but lacks bass, is muddy or is too dry in all other situations you still have some work to do.
Monitors
I use JBL LSR4328 active monitors. These are especially useful as you can “tune” them to a particular listening position in the room. Choice of studio monitors can be very subjective, but they should of course be designed to allow you to hear plenty of detail without flattering the sound. Hi Fi speakers are often designed to enhance the sound at some frequencies which may cause you to under-emphasise those frequencies when you mix. I built some stands for them which are basically columns made from 1/2″ thick MDF 3 feet high by 10 inches by 10 inches and filled with sand to isolate the speakers. I based the height of the stands on having the tweeters at the same level as my ears when I’m sitting down.
Absorption & Diffusion
Once the sound is out there in your room you have two main considerations, Absorption and diffusion. My aim was to cut down the reverb time of the room using absorbers, but to leave enough sound reflection so that I did not compromise by adding too much reverb to the mixes. Luckily the room is not completely square, parallel walls can cause the worst problems as the sound waves will bounce back and forward.
Diffusion
Dedicated diffusion panels will help to diffuse waves which might otherwise bounce around, however I decided to wait and see if there were any problems once I’d sorted out the absorption. As it happens everything seems to be quite good. Once you get some furniture and a few irregular surfaces such as bookshelves and ornaments you may find that is all the diffusion necessary. In fact I seem to remember a Sound On Sound article which mentions that a bookshelf (ideally with different size books) can make a great diffusion panel. Purpose built diffusion panels are available but I shall be researching some DIY alternatives soon…
Bass Absorption
The thicker and more solid the walls are, the more likely you are to get a problem with bass frequencies (something to be aware of when soundproofing). Once again I was quite lucky with this room, the back of which is formed by a bay window with sealed double glazing units. These act as a bass trap, but only at certain frequencies, mainly around 200hZ. I am about to build some bass traps, however this is not a priority as any bass problems here are at the back of the room and do not affect my listening when sitting at my normal mixing position. I am currently working on a design based on these.
High and Mid Frequency Absorbers
In my previous studio I mounted absorbing panels either side of the mixing area and on the ceiling above it. When I moved to my new studio the ceiling was much higher and the floor is hardwood, so I needed quite a few more panels. I now have two panels behind the monitors, one on either side, two large ones on the ceiling above the mixing position and two smaller ones on the ceiling at the back of the room. I was going to make some more, but after adding a sofa and a rug into the equation the room seemed to be about right, and once again, no complaints from mastering engineers. In the next section I’ll explain how I built the HF absorbers